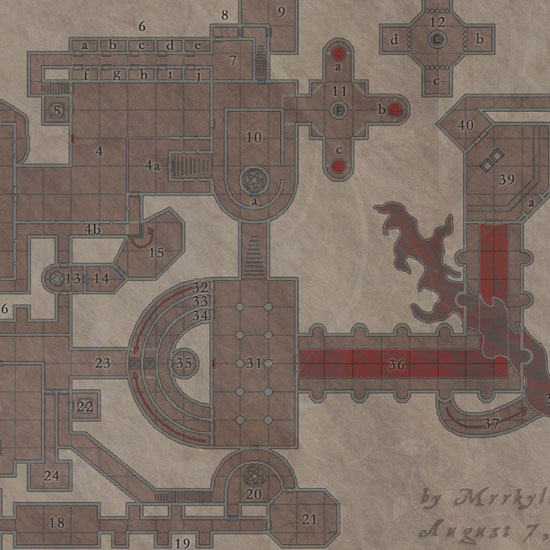
This is a mapmaking competition entry from Mrrkyllothur.
***** Update *****
As mentioned here, I offered to post updated maps for our competition participants if they felt like implementing some of the advice given by judges/commenters on their original submissions. Mrrkyllothur has done thusly, and here is his updated map:

***** Resume Original Post Below *****

Software used
- CC2 (floor plan), PSP8 (editing), PS7 (post work), Map Tools v1.3.b63 (dungeon dressing)
- Background patterns were made from textures supplied by freaky665.deviantart.com
A few viewers might recognize my old school style of mapping from the Cartographer’s Guild. When making maps I try to design them to be easy on the eyes yet with enough detail to be easily deciphered and compatible with Map Tools.
Design Notes
After drawing a map, I usually jot down area descriptions on a notepad before adding inhabitants and their stat blocks. What follows are my initial (incomplete) thoughts which tend to change as I develop the theme and goals for the adventure.
Miscellany
- Unless noted, floor to ceiling height throughout the dungeon is 10′.
- Lower elevations are slightly lighter in color than the main level (hardly discernable in this sample size and resolution).
- There are two, false, trapped doors in the dungeon. Each will strip all possessions from the first person that tries to open, inspect (physical contact), or attack it and teleport the nude victim to 12a, b, c, or d. The victim’s possessions are transported to the treasury (35). The teleportation works once for each door. The doors are locked and trapped with poison needles.
Key
- 1. The Descent into Darkness – The stronghold entrance can be situated on a cliff-face (for limited, aerial access) or near the base of a mountain.
- 2. Cavernous Chamber – (30′ high, floor to ceiling) Surrounding this area are catwalks. Those on the upper side (north of stairs) are 20′ high and those on the lower side (south of stairs) are 15′ high. Both have arrow slits. This is an ideal ambush site.
- 3. Old Warrens – This was part of the lair of the area’s original inhabitants, before the stronghold was completed. The exit is 25′ above the stronghold’s entrance.
- 4. Reception Hall – this is another perfect place for an ambush.
- 4a. Platform of the Planar Lord – (15′ high) from this elevated vantage, the Planar Lord (or his minions) greets visitors.
- 4b. Defenders’ Walk – overlooks areas 2 and 4 (15′ high).
- 5. Trap
- 6. Acolytes’ Cells (Guest rooms or crypts?)
- 7. Kitchen/Mess
- 8. Privy
- 9. Armory
- 10. Study (15′ ceiling)
- 10a. Secret Summoning Chamber
- 11. Chapel
- a-c. Ceremonial Braziers – with the designated type of incense and the proper chants various properties may be invoked (curing, communication, clairvoyance). The hole descends 80′ to area 12.
- 12. Silent Prison – (15′ ceiling at center; 80′ to upper level) A pair of beasts (trained pets) occupy the center of this room, deterring escape attempts by the hapless occupants of the cells.
- a-d. Cells – Each of these 10’x10’x10’cells is affected by a permanent silence spell.
- 13. Stone Guardian (or golem, gargoyle…)
- 14. Private Study
- 15. Master’s Quarters – A rotating corner (secret door) pivots 180 degrees to open (as shown) or seal the passage (4b) from 4a to 13.
- 16-19. Galleries – various art objects collected during the Planar Lord’s travels are displayed here. At least one of “statues” is a petrified former adversary.
- 16a-b. Expertly cut stones can be pulled out to reveal wedge shaped “windows” (similar to arrow slots) that look down into a temple (25). Treat the openings as concealed doors for detection purposes.
- 20. Summoning Chamber (or Teleporter)
- 21. Library
- 22. Trap
- 23. Darkened Hall – affected by continual darkness; additionally, trespassers not of the appropriate alignment are struck blind.
- 24. Sanctuary (of the High Priest)
- 25. Minor Temple (25′ high ceiling). The trap door is triggered by tampering with the altar.
- 26. Storage
- 27. Main Temple (20′ high ceiling)
- a. – storage for priestly vestments and objects
- b. – deific depiction sculpted in gold
- c. – secret panel
- 28.
- 29. Archway – leads to a Planar Gate
- 30. Priest’s Quarters
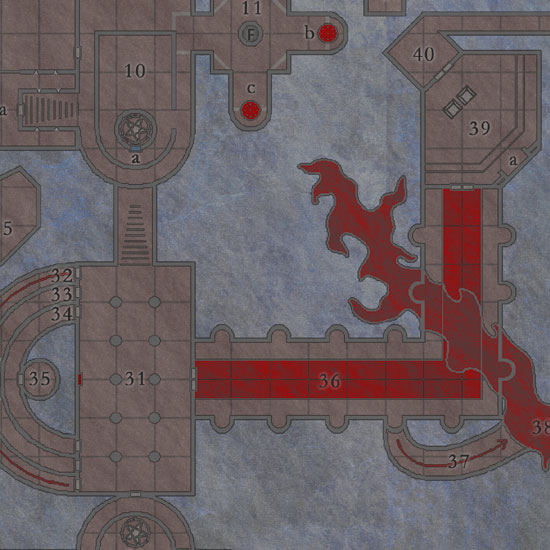
- 31. Charged Hall – (20′ high ceiling) a wall of lightning (3 second duration) forms when a creature or object passes between the anchor points shown below. The intensity of subsequent charges within a 10 minute period is doubled so that the first bolt causes 1d6 of electrical damage, the second 2d6, the third 4d6, the next 8d6, and so on.
- 32. Slippery Slide into a 60′ deep, moldy (insert a nasty mold, slime or ooze here) pit.
- 33. Crescent Corridor – 10′ from the bottom of the 30′ deep pit is a secret passage into area 23.
- 34.
- 35. Treasury – magically warded to prevent scrying.
- 36. The Molten Corridor – (25′ to 35′ deep) is bordered with ledges 15′ above the floor of area 31. Originally I pictured the nooks being occupied by nesting, exotic and feral winged beasts. When I was dressing the map in Map Tools I decided to fill the nooks with strange (enchanted?) lights. If I get around to writing up this adventure I’ll probably come up with something else. Possible encounters include a fire elemental, lava trolls, and winged beasties.
- 37. Searing Slide – The floor of the adjacent niche springs open when sufficient weight is applied to it, dumping occupants onto the slide.
- 38. Chasm – this molten chasm is 35′ to 70′ deep.
- 39. Chamber of Thrones – (25′ ceiling) a pair of ornate thrones face a fanciful arch.
- a. – an elaborate arch frames a seemingly ordinary wall.
- 40.
- 41. Guardian
- 42. Frozen Pool (40′ deep)
Copyright information for this map: This work is licensed under a Creative Commons Attribution-NonCommercial-ShareAlike 3.0 Unported License.
I think is a very smooth and nice style but the DJ elements don’t seem to fit in with the map…they’re more vibrant and colorful.
Very classy map and fun to look at. I think the color/shade choices compromise it somewhat though because there isn’t enough contrast between the floor and the features so it all sort of bleeds together.
The majority of the floorplan itself seems faded just a bit too much into the background. It looks washed out and contrasts too strongly with some of the features at the bottom of the map.
Apart from that it’s a very good map. It’s supremely readable, conveying its information clearly without sacrificing aesthetics.
I love the overal look and feel and it’s detailled and ready to use (an interesting and believable dungon). Also the choice of colors is great. I think the bottom pieces don’t fit in though, they ‘overcrowd’ the map. I would have made the main map a little smaller giving the other maps some more breathing room.
Classic looking floorplan. Readable, easy to understand. Only thing that needs improvement is the contrast of the building and the background, which seems too weak for me.
I’ll also chime in on the contrast issue – I’d like it to stand out a little more – but even so it remains very clear. I’d certainly want to pull the magma out a bit – that’s a feature that should be bright and vibrant.
I like the flow of the dungeon. There’s lots of ways to get to different places and a pleasing lack of 20′ by 20′ rooms. Different areas have interesting features showing lots of imagination. I can tell this would be a fun place to explore jsut from the map – and that’s great.
I like the blown up maps at the bottom. That really allows you to highlight the different features. However I have to agree with the other comments – the set dressing does not fit in with the style or level of detail of the rest of the map. They would need to be adjusted to blend in with the style.
Overall a good clear map with a great design. Well done!